Grafting Trees: The 3 Cuts That Decide Whether They Take
Three cuts decide most dormant whip-and-tongue grafts: the rootstock bevel, the matching scion bevel, and the short tongue that locks the two pieces together. Get those surfaces clean and aligned, and the binding is mainly there to preserve contact; get them wrong, and wax cannot rescue crushed tissue or a drying cambium.
This method suits young, healthy stems of similar thickness, especially apple, pear, and other compatible woody fruit trees. The practical example below uses pencil-thick wood and a dormant scion with three viable buds. That is a useful working scale, not a rule for every species or climate.
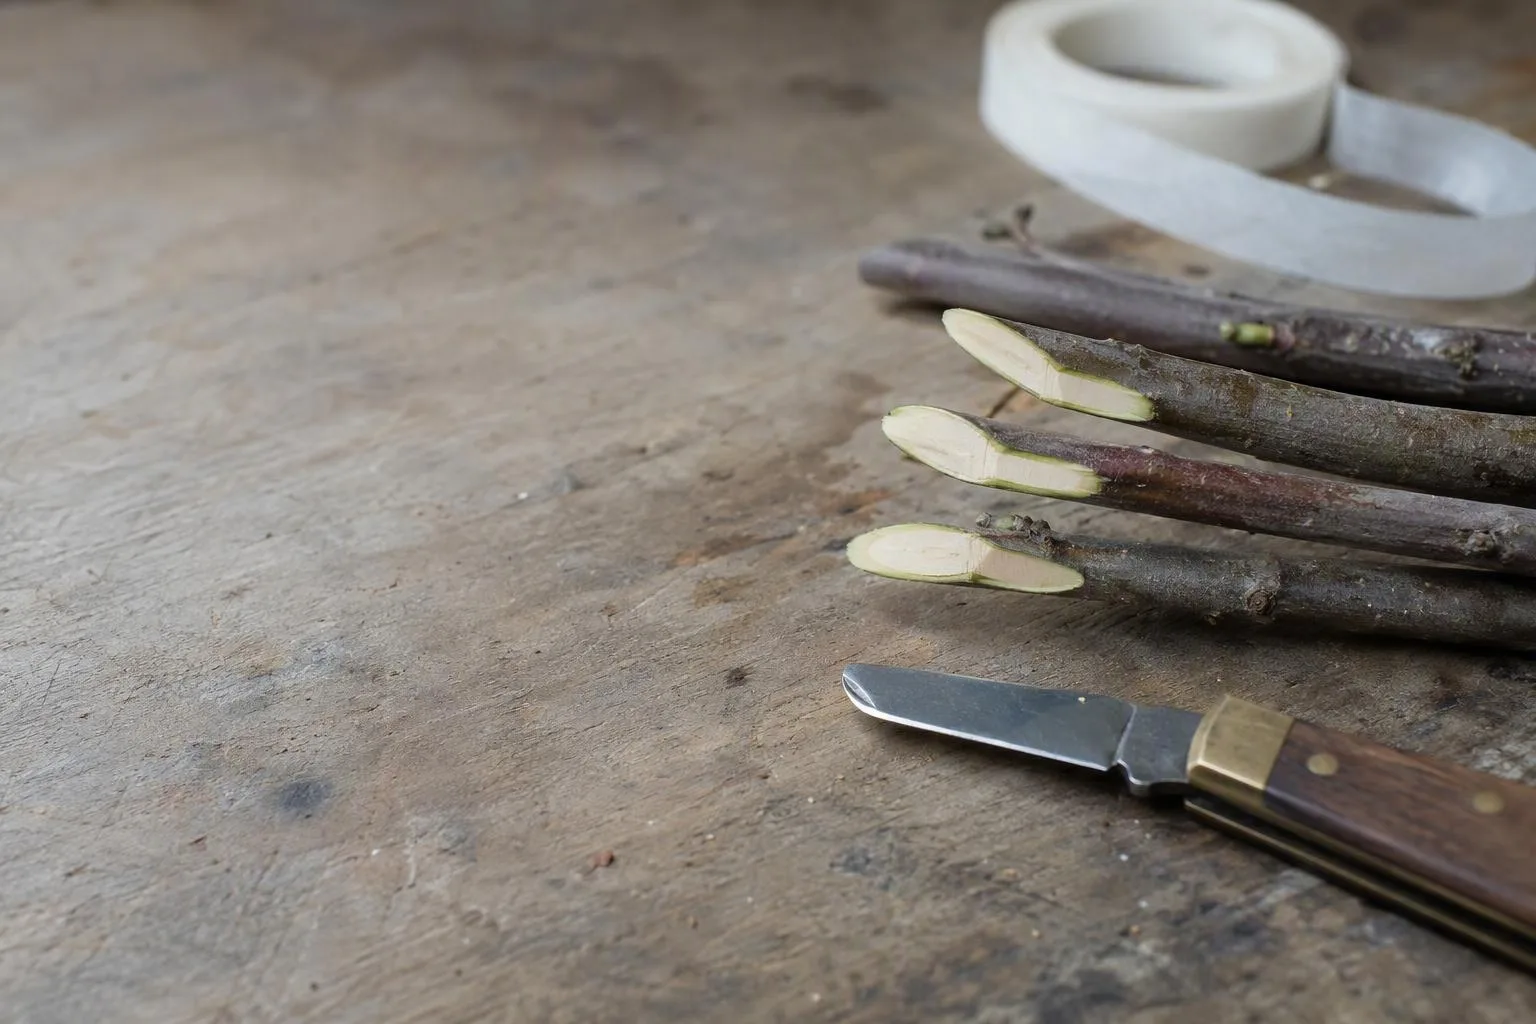
Start with the right graft: these three cuts describe a whip-and-tongue union
A whip-and-tongue graft is not simply two angled sticks tied together. The long bevels create broad contact surfaces, while the tongues act like interlocking steps. That mechanical lock matters because the pieces can shift before the tie has done its job, particularly outdoors in wind or on a bench where the scion is handled repeatedly.
Choose this method when the rootstock and scion are close in diameter. If one piece is much thicker, forcing the scion into the centre gives you a neat-looking union but may place the cambium on neither side. A cleft or bark graft is usually the more sensible choice for a large branch; those methods accept a diameter mismatch by placing the scion against the edge of the stock rather than pretending the centres match. The comparison between cleft grafting versus whip-and-tongue grafting for apple trees is worth making before you cut.
For dormant whip-and-tongue grafting, the usual window is late winter: the scion remains dormant, while the rootstock is close enough to active growth that callus can form after joining. In a cold zone 5 garden, that may mean bench grafting in late February or March and holding the finished plants under protected conditions. In a mild climate, outdoor work may be earlier. The decision should follow the wood, not the calendar: buds on the scion should still be tight, and the stock should not be so cold that the cut surfaces sit inactive for an extended period.
Prepare the knife, ties, sealant, labels, and clean storage for the scions before making the first cut. The cut surface begins losing moisture as soon as it is exposed. A grafting knife should be sharp enough to shave a thin curl from a scrap of wood; a blade that crushes the edge will leave damage hidden beneath an apparently smooth bevel.
Cut 1: make the rootstock face flat, fresh, and long enough to hold
Start with a straight section of healthy one-year wood or similarly young stock. Remove side shoots and choose a place without a swollen bud, scar, or damaged bark. The aim is a clean plane running diagonally across the stem, long enough to provide useful cambial contact and room for the tongue.
- Hold the rootstock securely against a cutting block or your gloved hand, with the intended bevel facing away from you.
- Place the knife near the point of the finished union and draw it toward you in one controlled movement, keeping the blade angle consistent.
- Inspect the surface. It should be flat from edge to edge, with no raised step, torn fibres, hollow scoop, or crushed bark margin.
- If the cut is poor, make one fresh corrective cut rather than repeatedly scraping the surface. Repeated trimming shortens the bevel and can leave the cambium at an awkward angle.
A bevel that is too short gives little room for cambium contact and makes the tongue crowded. One that is excessively long can be difficult to hold steady and may leave a thin, weak strip of wood. For a pencil-thick stem, a bevel around two to three stem diameters is a reasonable bench target, but treat that as a working proportion rather than a universal measurement. The surface must be long enough to align and bind; it does not win points for length alone.
Make this cut immediately before joining. If the rootstock has to wait while tools are found or a label is written, cover the exposed surface with a clean, slightly damp material for a short interval rather than leaving it in moving air. Do not soak it. Saturation adds its own problems, and water sitting on a cut surface is not a substitute for rapid joining.
The most revealing failure is a bevel that looks pale and ragged at the bark edge. A smooth centre with crushed outer tissue is still a poor grafting surface because the cambium lies close to that edge. A sharp knife changes the biology by reducing dead, compressed tissue between the two living cambial zones.
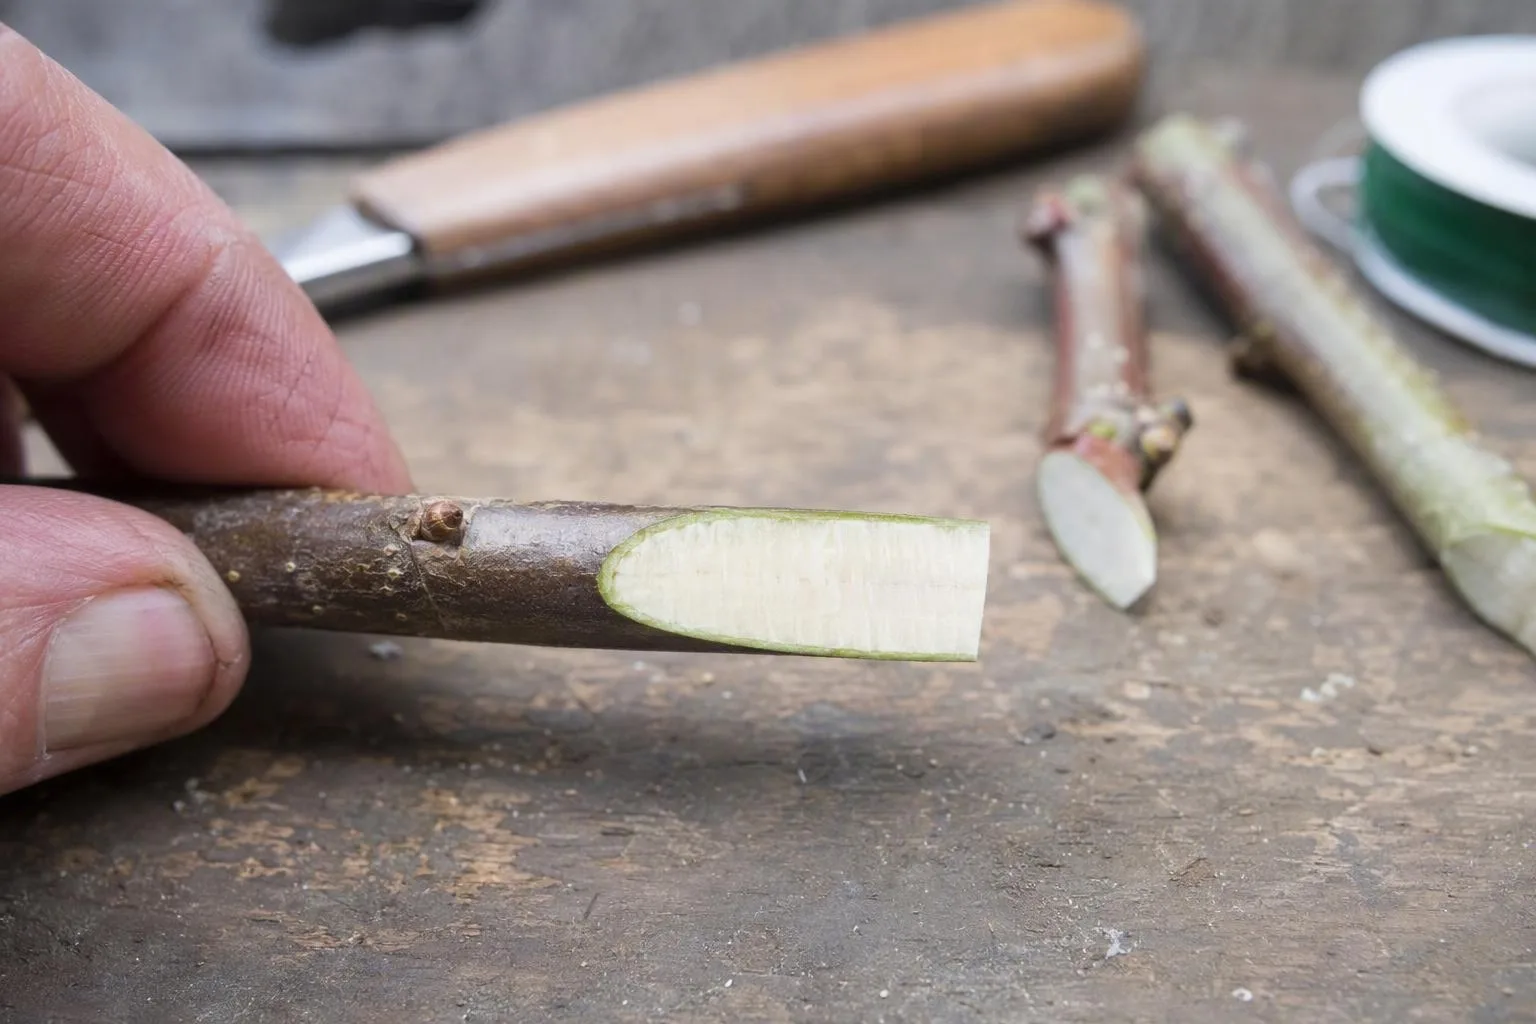
Cut 2: copy the angle on the scion, then cut the tongue that stops it sliding
Use dormant, one-year scion wood with firm buds and no shrivelling, mould, or darkened cut ends. A piece with three or four buds gives room to make the union and still leave enough growth above it. The lowest bud should not be buried inside the graft; orient the bevel so that bud sits just above the finished union.
Scions should be kept dormant until grafting. If you are collecting or receiving them well ahead of the work, follow the practical steps in how to store dormant scions before spring grafting. Keep fruit away from stored scions: ripening fruit releases ethylene, and that signal can push dormant plant material toward ageing or premature bud activity. The exact effect depends on concentration, exposure, temperature, and species, so the useful rule is simple: store scions cool and separate from fruit rather than testing the boundary.
Copy the rootstock bevel as closely as your knife control allows. The scion does not need to be mathematically identical, but a mismatch creates gaps or pivots the pieces apart. Put the lowest retained bud on the outside of the union, then make the long bevel in one draw. Avoid cutting toward the bud if doing so leaves a ragged bud base or removes the bud’s supporting wood.
Now make the tongue. Starting roughly a third of the way down from the tip of the bevel, cut into the wood parallel with the grain. Stop before the cut reaches the opposite edge. The same cut is made on the rootstock. The two tongues should slide together instead of becoming two loose flaps.
This is the point where beginners often cut too deeply. A deep tongue may seem more secure, but it removes too much wood from the centre of the union and leaves a thin hinge that can split during binding. A shallow tongue may fail to lock the pieces, yet it is easier to correct. The useful test is not a particular depth on a ruler: when the two pieces are dry-fitted, they should resist sliding lengthwise while the bevels remain fully supported.
Dry-fit the pieces before applying anything. Look down the length of the stem. The bevels should meet without a visible open wedge, and at least one cambial edge should run continuously from top to bottom. Cambium is the thin growth layer just beneath the bark, not the central pith. On a small, well-matched pair, both sides may align. On a slight mismatch, one continuous edge is the practical minimum to pursue; centring the scion is less important than placing living growth layers together.
Keep the cut surfaces clean. Do not touch them with dirty fingers, and do not rub them together to “polish” the match. Rubbing can bruise the very cells the union needs.
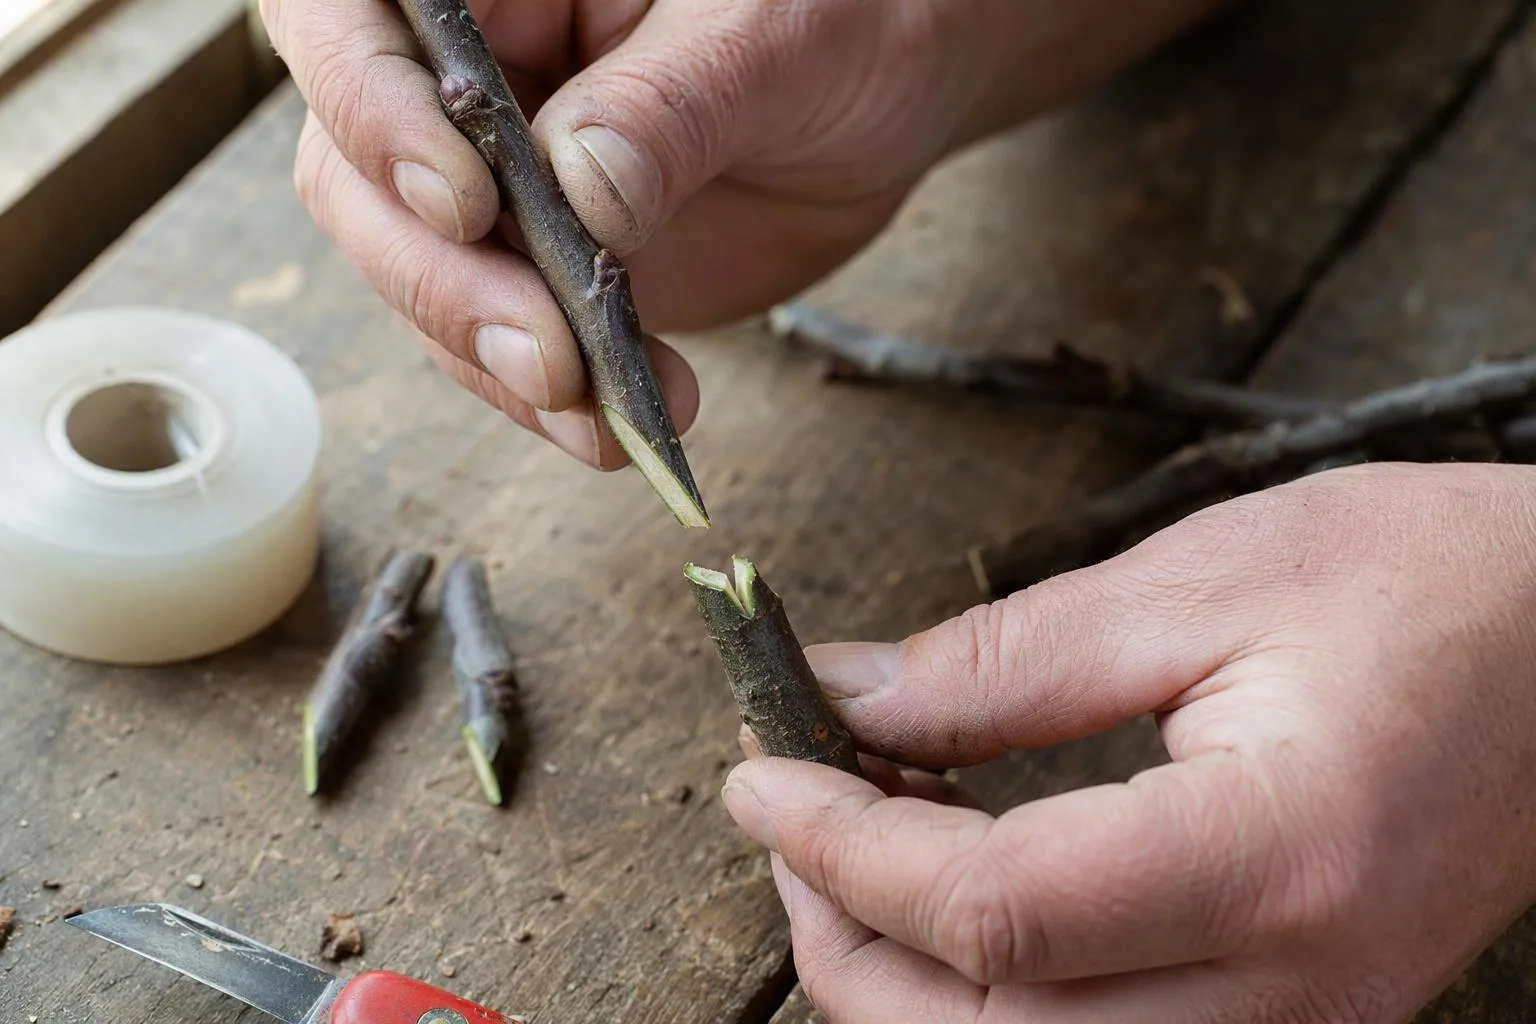
Cut 3 is the alignment check: join one edge, bind immediately, and seal the wound
Bring the rootstock and scion together with the tongues interlocked. If their diameters differ, align one cambium edge and allow the surplus bark or wood to sit on the opposite side. A centred scion that contacts no cambium is a failure disguised as symmetry.
Bind from below the union upward, keeping the pieces pressed together without squeezing the bark flat. Grafting tape, budding rubber, or another purpose-made tie can work if it holds the surfaces immobile and can expand or be removed before it cuts into swelling tissue. Seal the exposed end of the scion and any open shoulder of the rootstock. The purpose is to slow moisture loss while the union begins callusing, not to bury a wet wound under a permanent coating.
Label the cultivar and rootstock immediately. That sounds administrative until a successful graft produces vigorous shoots and the label is missing. The first spring shoot may come from the stock, not the scion, especially if a bud below the union was left active.
A workable aftercare sequence looks like this:
- Graft day: bind, seal, label, and place the graft where it will not dry out or be knocked. Avoid direct heat against the union.
- During the first several weeks: keep the stock evenly supplied with moisture, but do not leave the union sitting in wet compost or water. Inspect the seal for splits and the tie for constriction.
- As buds swell: remove shoots that emerge below the graft, unless one is deliberately being retained as a temporary nurse shoot. The method for identifying rootstock shoots below a graft union matters because their leaves can look healthy while the scion remains dormant.
- After new scion growth is clearly established: loosen or replace a tie that is beginning to bite. Protect the tender shoot from being rocked by wind, because movement can tear a union that is alive but not yet strong.
Do not judge the graft by one green bud alone. A scion can retain enough stored water and carbohydrate to push briefly even when the union is failing. Better evidence is a combination of swelling buds, continued green tissue, callus bridging the join, and new growth that does not wilt after its first flush.
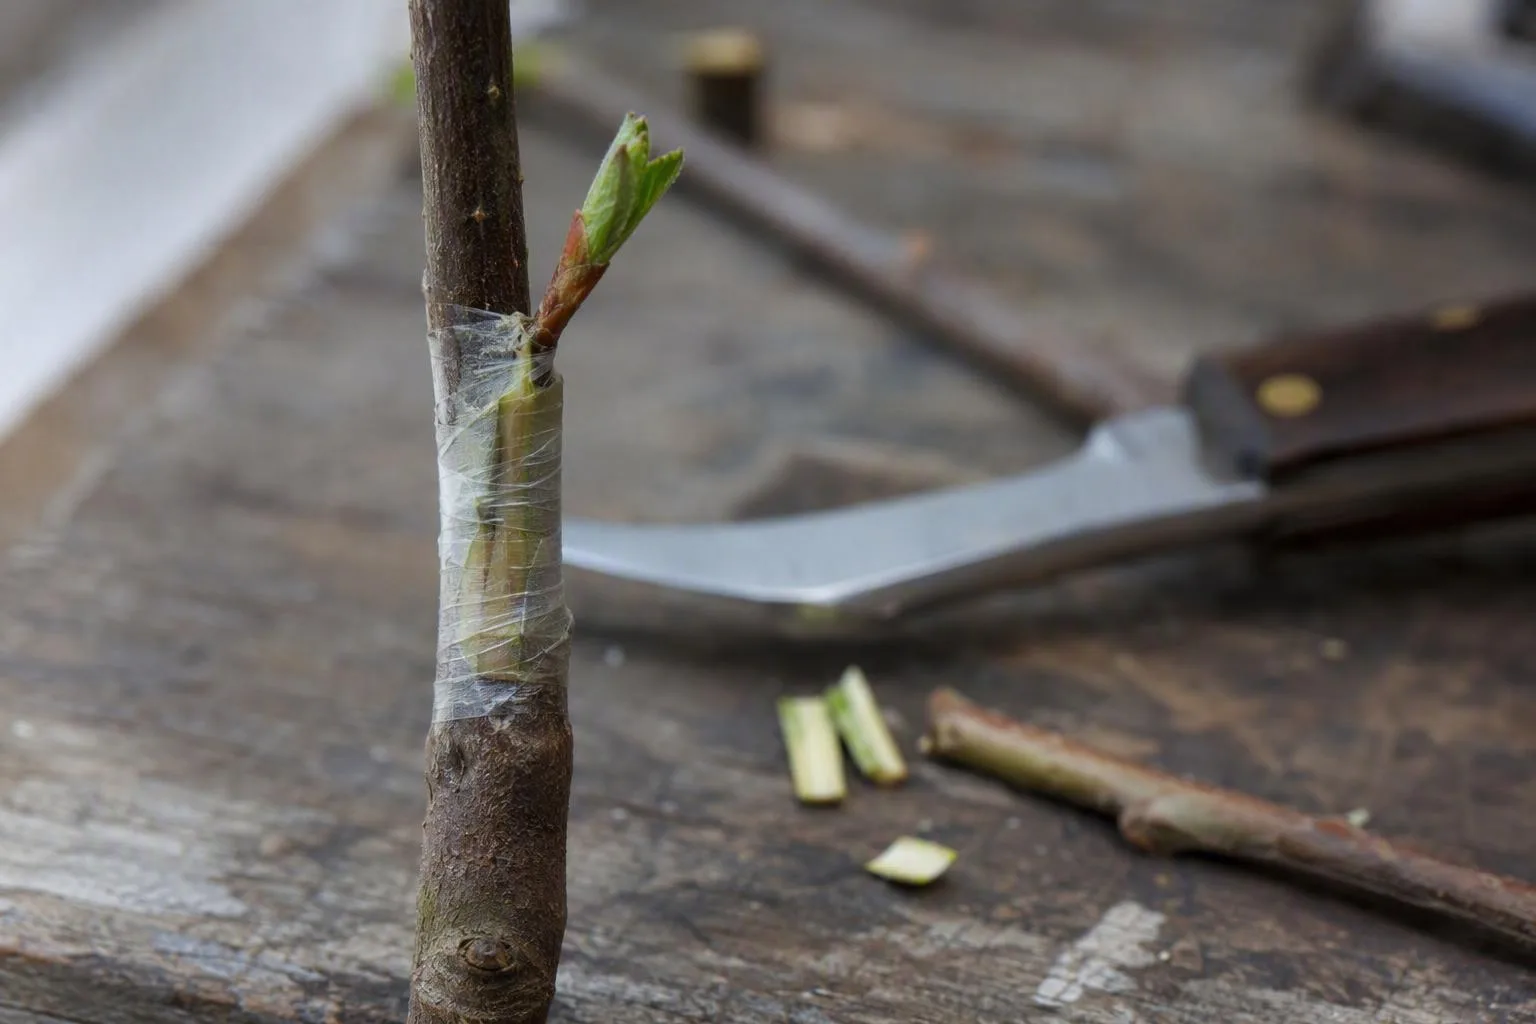
Aftercare is a separate job from making the cut
The union needs protection from drying, movement, and competition from the stock. Those are different problems, so one product or one inspection cannot solve all three. A perfect seal does not compensate for a loose graft, and a tight tie does not compensate for cambium that never met.
Check the union at regular intervals rather than pulling it apart to see whether it has healed. A successful callus bridge is easily damaged by curiosity. Look for a dry, sunken scion end; a loose tongue; cracks through the seal; or swelling that is trapped beneath the tie. Keep the graft upright and supported if the scion produces a long soft shoot before the union has thickened.
For bench grafts, the storage environment should keep the wood from drying while avoiding conditions that encourage mould. For outdoor grafts, wind exposure and rapid temperature swings are the larger practical threats. Species, rootstock vigour, and local spring weather change the pace, so a calendar date is less useful than the sequence of visible signs.
My judgement call is to remove competing stock shoots early, but not to strip every leaf from the rootstock at the first sign of a graft. If the scion is slow and the stock is weak, a carefully placed temporary shoot can maintain sap flow; it must be removed once the scion is growing strongly. This is a management choice, not a claim that every graft benefits from nurse shoots.
Diagnose the failure before you blame the technique
A failed graft usually leaves a physical clue. Read the union before repeating the same cut.
- Brown, dry cambium on both pieces: suspect delayed joining, poor storage, or exposure of the bevels to drying air. Recutting a fresh surface and joining promptly is the correction for the next attempt.
- One side green but the scion shrivels above the union: inspect cambial alignment on the side that was actually touching. A green edge on the stock does not prove the scion was connected.
- The scion is green but never extends: check dormancy, bud viability, temperature, and whether the tie or seal has damaged the stem. Stored reserves can support a bud for a while without a functioning union.
- The pieces separated cleanly: the tongue may have been too shallow, the tie may have loosened, or the union may have moved before callus bridged it.
- Strong shoots appear below the join: they are stock growth. Remove or manage them according to the aftercare plan; do not mistake vigour below the union for a successful cultivar graft.
Compatibility also matters. Related species often have better prospects than distant pairings, but “same family” is not a guarantee of a durable union. Before committing scarce scion wood, make a graft-compatibility check for the exact stock and cultivar combination. If the pairing is uncertain, treat the result as a trial rather than a reliable propagation route. For late-summer work, bud grafting fruit trees in late summer is a different method with different timing and cut geometry, not a rescue version of a dormant whip-and-tongue graft.
Questions that come up at the knife bench
What is the best time of year to graft trees?
For dormant whip-and-tongue work, graft while the scion is still dormant and the rootstock is approaching active growth. In many temperate gardens that means late winter or very early spring, but local temperature, species, and whether the graft is made indoors or outdoors change the window. The buds and wood are better indicators than a fixed date.
Can I graft a large branch with the whip-and-tongue method?
Usually, no. This cut geometry is suited to young, similarly sized pieces that can be held together along matching bevels. A large branch creates a different mechanical and cambial problem. Cleft, bark, or another branch-grafting method is generally better suited, with its own risks and aftercare.
How long before I know whether a graft has taken?
Look for a progression rather than one deadline: retained green tissue, swelling buds, callus at the union, and sustained new growth. A green scion by itself is weak evidence because stored reserves can keep it alive temporarily. If the scion is dry and the union is loose, waiting longer rarely repairs the original contact problem.
The useful line to remember is this: the tie holds the graft still, but only matching living edges make it grow together. Before the next cutting session, decide whether your wood actually matches in diameter. If it does, practise the three cuts on spare prunings until the tongues interlock without force. If it does not, change methods before you spend the scion.
Frequently Asked Questions
What is the best time of year to graft trees?
For dormant whip-and-tongue grafting, describe the usual late-winter window when scions remain dormant but the rootstock is approaching active growth; note that the exact timing varies with species, local spring temperatures, and whether the graft is bench-made or outdoor.
Can I graft a large branch with the whip-and-tongue method?
No: explain that whip-and-tongue is best for young, similarly sized wood. Larger branches are generally handled with cleft, bark, or other grafts whose cut surfaces and risks differ.
How do I know whether a graft has taken?
Point to swelling buds, retained green tissue, callus bridging the union, and new growth as useful signs, while warning that a green scion alone is not proof because stored reserves can support it temporarily.