Grafting Diagram for Beginners: Match the Cambium, Not the Bark
A beginner’s grafting diagram is useful only if it shows the layer that matters: the thin cambium just beneath the bark. For a whip-and-tongue graft on dormant apple or pear wood, make matching sloping cuts, seat the tongues, and align at least one continuous cambium edge. The bark may line up beautifully while the cambium misses completely, leaving a neat-looking joint with no reliable vascular connection.
That is the practical rule: match cambium, not bark. If the stems differ in diameter, shift the narrower scion to one side instead of centering it. One accurate edge is more valuable than symmetrical outer bark.
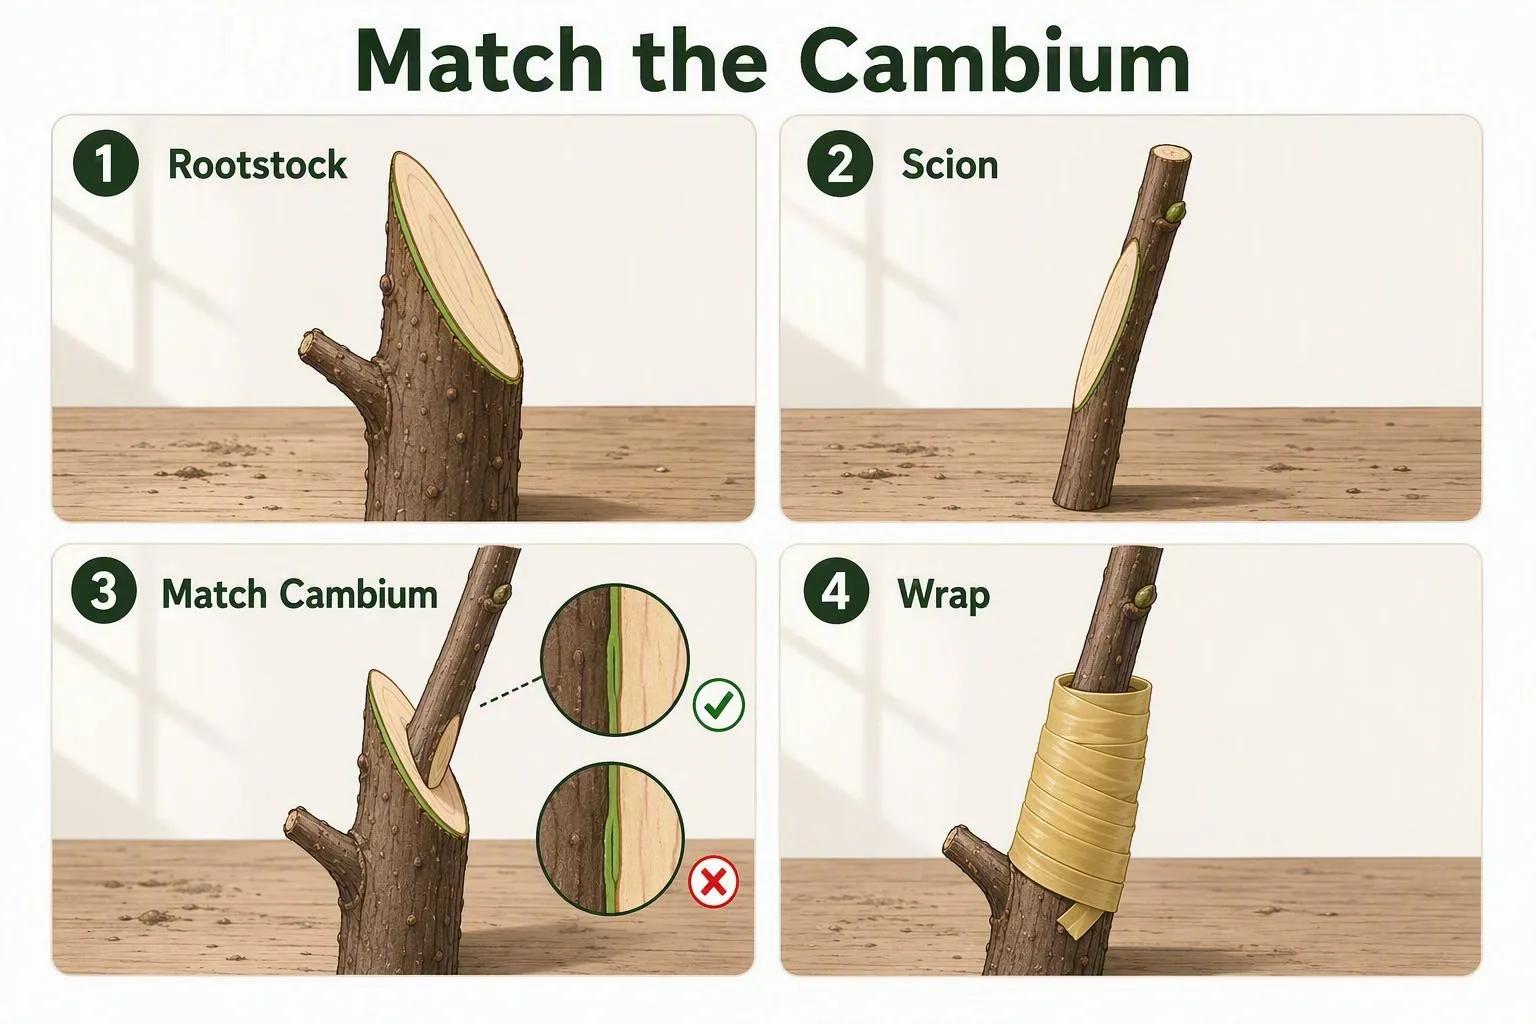
The beginner’s grafting diagram: two clean cuts, one cambium match
Picture the rootstock and scion as two pencils cut on long diagonal faces. Those faces create more possible contact than a short square cut, but contact is useful only where the cambium layers meet. Cambium is the stem’s living growth zone. Once the cut surfaces are pressed together, cells near the cambium can produce callus, and that callus can develop into the continuous tissues needed for water and carbohydrate movement.
In a simple diagram, the cambium is usually drawn as a bold green line. In a real stem it is a very thin zone, often impossible to identify confidently without a fresh cut and close inspection. The diagram enlarges it because the beginner needs to see the alignment rule, not because the plant contains a thick green stripe.
Make the two sloping faces similar in length and keep them flat rather than scalloped. If the rootstock is wider, place the scion so one side of its cambium follows the rootstock’s cambium. Do not chase perfect bark alignment on both sides; that is impossible when the diameters differ.
Read the stem from the outside in before you make the cut
Start at the outside and work inward. Bark is the protective outer covering. Just inside it are phloem tissues, which carry sugars away from leaves. The cambium sits between phloem and xylem and produces new conducting and supporting tissues as the stem expands. Xylem occupies much of the woody interior and carries water upward. The pith is the softer central tissue in many young stems.
For grafting, you do not need to expose every layer. You need to understand why the bark can mislead you: bark thickness varies with age, species, drying, and position on the shoot, while the cambium is the relevant living boundary underneath it. A fresh, clean cut is therefore more informative than judging the outer circumference.
A node is the point where a leaf or bud arose. On a scion, buds determine the direction of new growth. A bud that points upward should remain above the graft; turning the scion upside down can place its vascular arrangement and growth orientation under unnecessary stress. The pith matters mainly as a warning: if your cut runs through soft, split central tissue, the face may not seat firmly.
To inspect a practice shoot, shave or slice a small section with a sharp knife and look for the narrow transition between the lighter inner bark and the wood. Don’t scrape repeatedly. Each extra pass bruises or dries the surface you are trying to join.
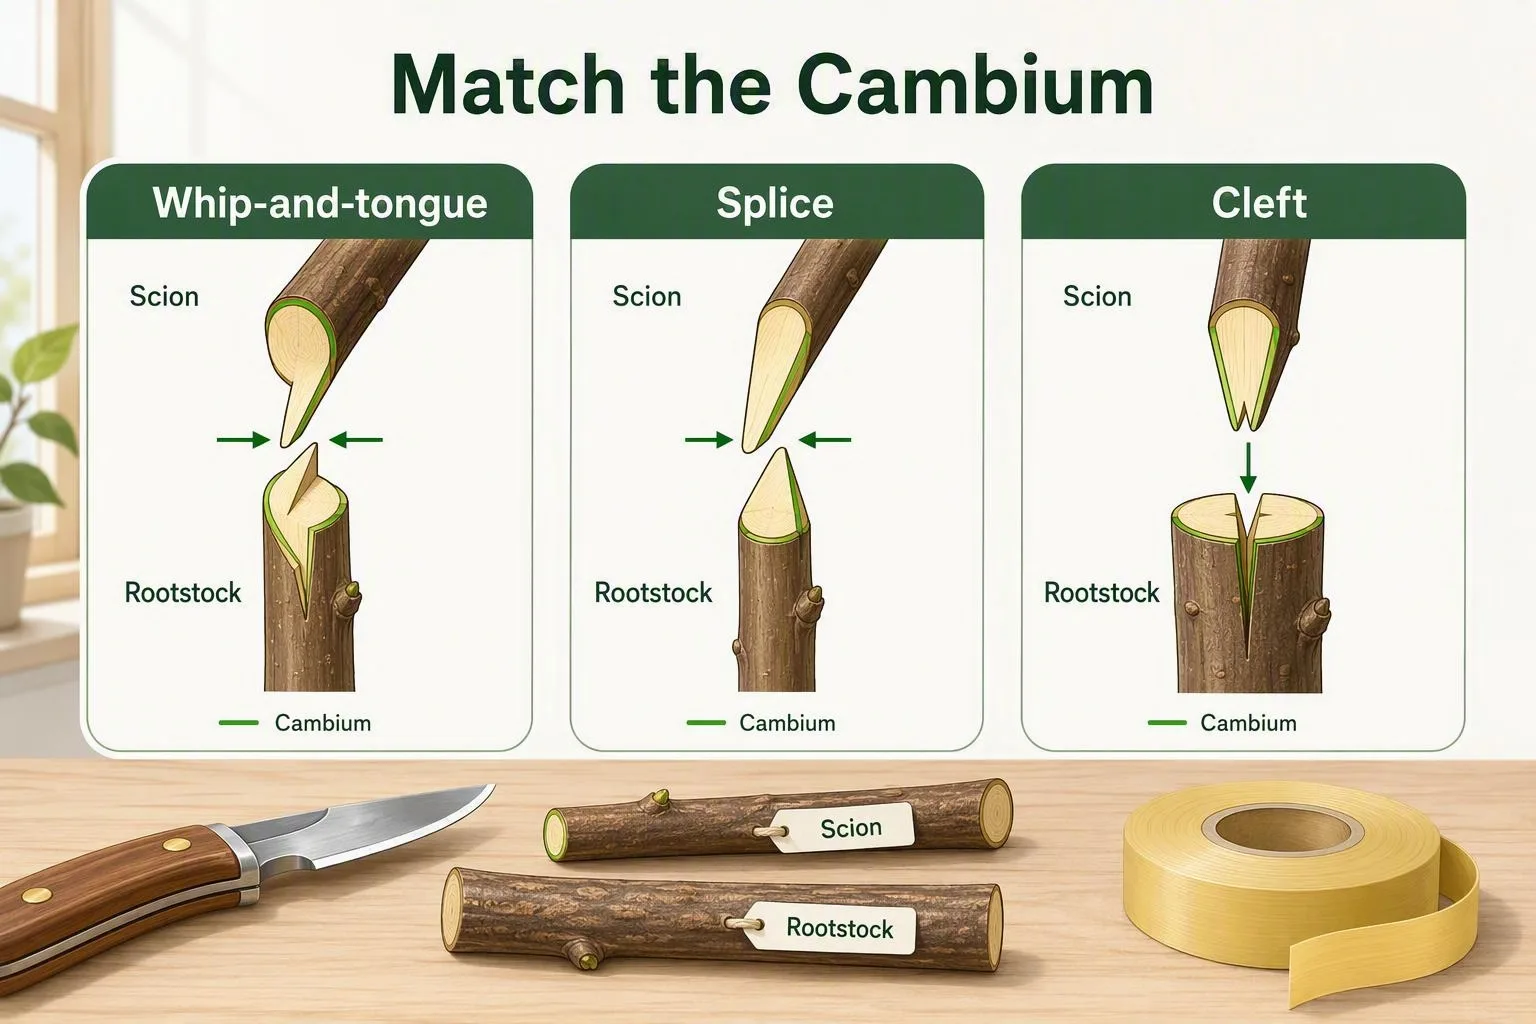
Three grafting cuts, compared at the point of contact
The best beginner method depends on the material in front of you, not on which diagram looks most impressive.
| Method | Where it fits | What the contact looks like | Where it becomes a poor choice |
|---|---|---|---|
| Whip-and-tongue | Similar-diameter dormant scion and rootstock | Long sloping faces plus interlocking tongues | Very soft, thin, mismatched, or actively swelling material |
| Splice graft | Similar-diameter shoots when simplicity matters | Two matching sloping faces held together | Windy sites or joints that cannot be bound firmly |
| Cleft graft | A thicker established branch receiving one or more smaller scions | Scion edge seated against the split branch cambium | Very small shoots or branches that would be badly split by the cut |
Whip-and-tongue offers a useful mechanical advantage because the tongues help stop the pieces sliding sideways. The extra cut is also the part most likely to go wrong: a tongue that is too deep can weaken the scion, while a short or ragged tongue will not hold the faces together.
A splice graft is the sensible practice route. It has fewer cuts and lets you concentrate on flat faces, fresh tissue, and one-sided cambium alignment. Its weakness is movement. If the binding slips, the two faces can separate even when the original cuts were good.
A cleft graft solves a diameter problem rather than a precision problem. The branch can be much thicker than the scion, but the scion still needs one cambium edge against the split wood. The exposed split and larger wound also demand careful sealing and support.
A dated practice sequence: prepare, cut, align, bind, seal
Use dormant apple or pear wood as the example. The calendar is conditional: in a cold zone 4 garden the rootstock may begin growth later than in zone 8, and a sheltered greenhouse can move the process earlier. Use plant condition rather than a fixed date.
- During full dormancy, choose the scion. Select healthy one-year shoots with firm wood and several viable buds. Avoid shrivelled, diseased, frost-damaged, or obviously weak pieces. If you need a refresher, follow a separate guide on how to collect and store dormant scion wood for spring grafting.
- Store it cold and slightly humid. The scion should remain dormant, not frozen, and should not sit in free water. A labelled, sealed bag with a little moisture-retaining packing material is more useful than an unwrapped bundle exposed to refrigerator air. Check for condensation, mould, and drying before grafting.
- Prepare the rootstock as growth is starting. The rootstock should be capable of callusing and supplying water, while the scion is still dormant or only just beginning to swell. The exact window varies by species and indoor or outdoor temperature.
- Sanitise and sharpen the knife. A dull blade tears fibres and makes it difficult to create a single flat face. Use a sharp grafting knife with the cut moving away from the supporting hand. Cut-resistant gloves are reasonable if they preserve control; bulky gloves that make the knife unpredictable are not protective in practice.
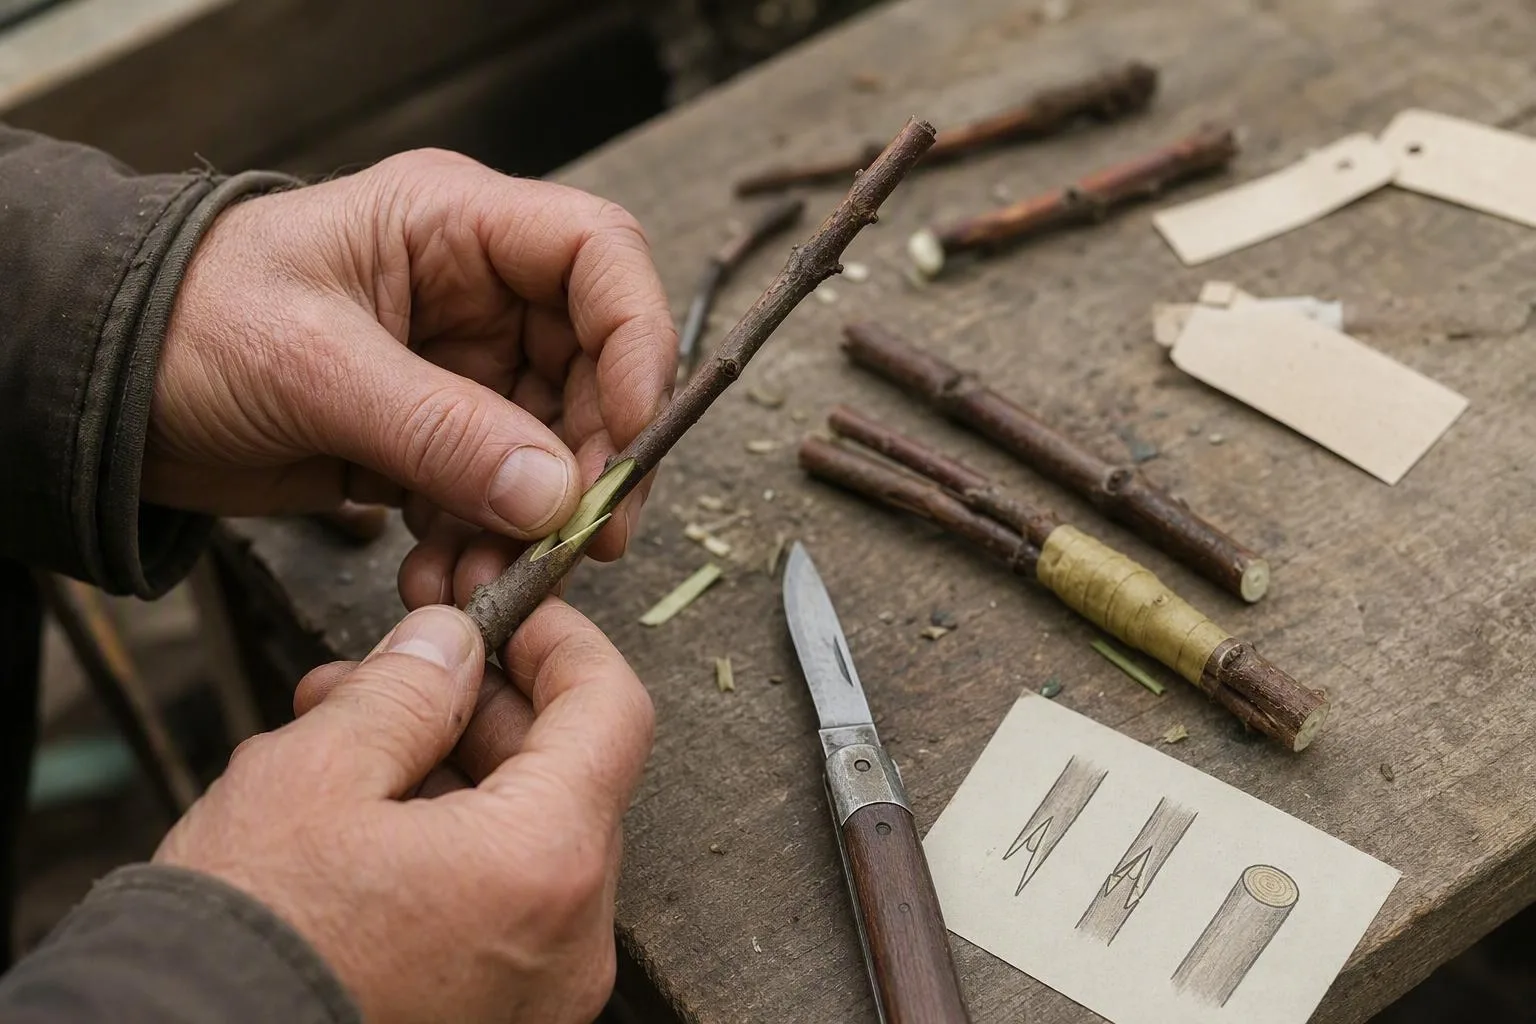
- Make the long sloping cuts. On a whip-and-tongue graft, the faces need to be broadly comparable so they can sit flush. Make the tongue cuts carefully and stop before the wood splits. Keep the cut surfaces out of sun and wind while preparing the second piece.
- Seat, bind, and seal immediately. Fit the tongues, align one cambium edge, and bind firmly enough to prevent rocking without crushing the tissues. Grafting tape that stretches can provide both pressure and a moisture barrier. Seal any exposed cut surface that the tape does not cover.
For edible crops, use clean tools and healthy, correctly identified plant material. Follow the label for any sealant or disinfectant, and keep treated materials away from harvested produce unless the label specifically permits that use.
The alignment test: what a correctly seated graft should look and feel like
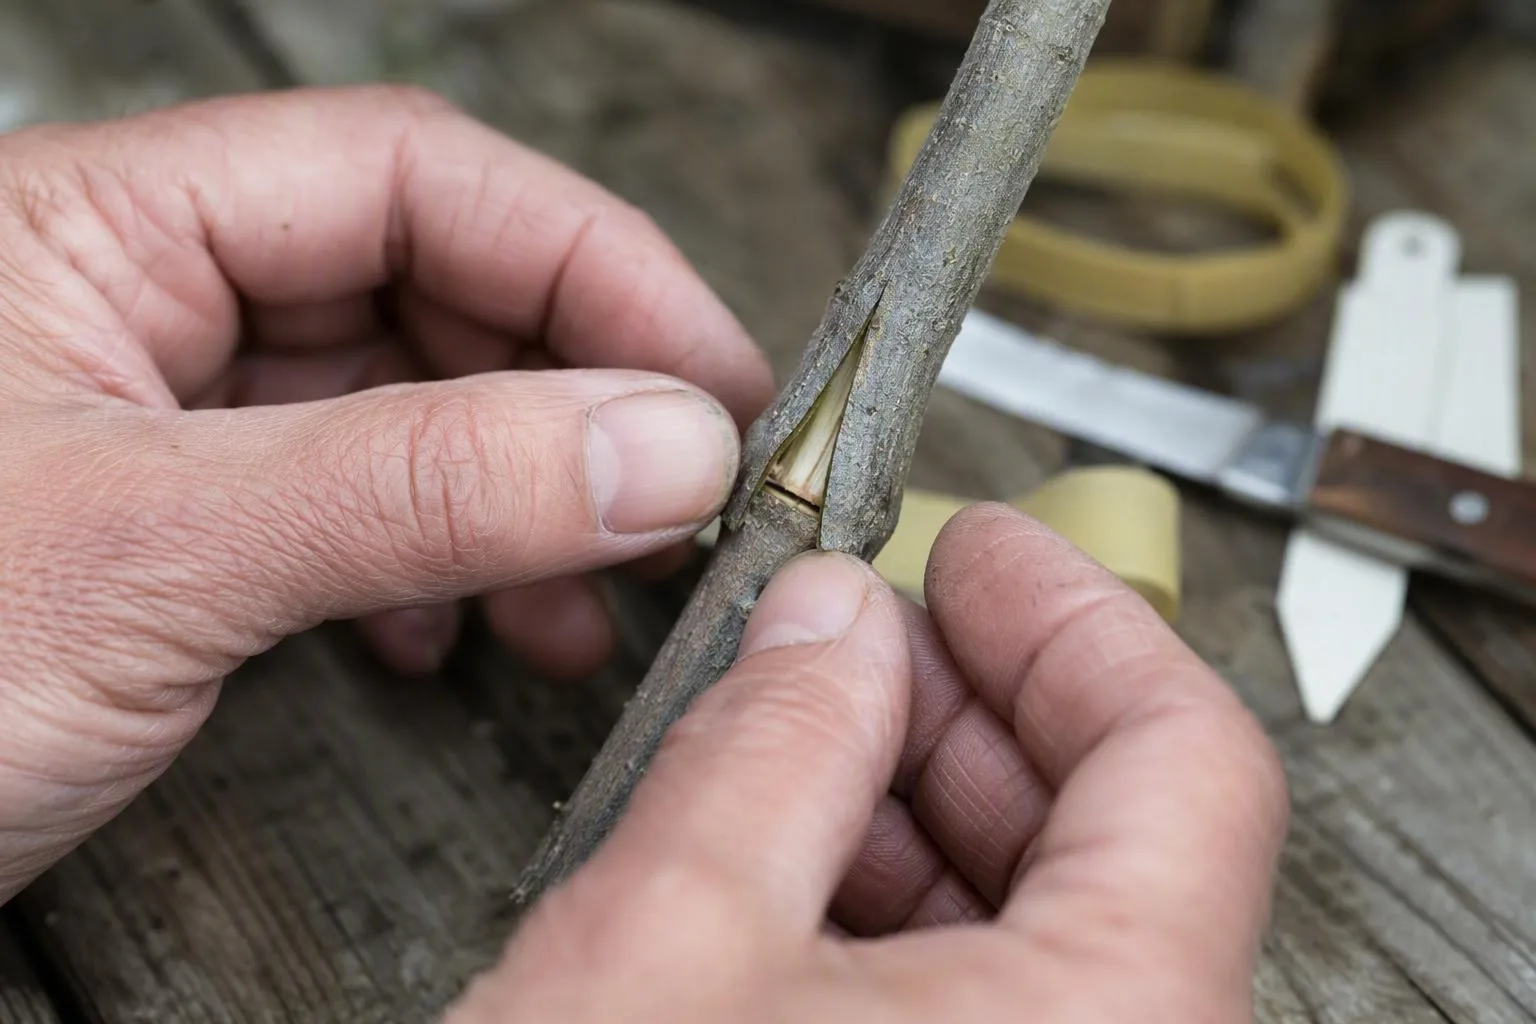
Before wrapping, inspect the joint from several angles. The cut faces should lie flat. There should be no leaf fragment, shaving, grit, or dried edge trapped between them. The scion bud should point upward. The pieces should not rock when you apply gentle fingertip pressure beside the joint.
Now check the cambium, not the bark. With matching diameters, the cambium may align on both sides. With unequal diameters, place the narrow scion toward one edge of the rootstock. The other side can show a bark step; that is acceptable. Centering the scion by its outside bark may leave both cambium edges floating inside the rootstock’s cambium.
Think of the alignment as a railway track rather than a bullseye. One continuous track along the joint gives the forming callus a route to connect. A visually centred scion with no matching track is decoration.
Once the joint is bound, avoid testing it by bending the scion back and forth. Flexing stresses the newly formed contact before it has strengthened, and the same movement that opens a gap can interrupt callus continuity. The firm test happens before binding; afterward, protect the joint rather than repeatedly checking it.
Why a graft can look perfect and still fail
The most deceptive failure is a bark-perfect joint with missed cambium. The scion may remain green briefly because stored reserves support it, then the buds dry or fail to extend. A second failure is assembly delay. A cut face can lose moisture while you are remaking the other cut, particularly in dry wind or warm indoor air.
Ragged cuts create air gaps and crushed tissue. Loose wrapping permits rocking. Excessive pressure can bruise the cambium and constrict the stem. These problems are easy to confuse because the outside of the graft may remain tidy for weeks.
Movement is especially damaging after bud break. New leaves increase water demand before the vascular connection is dependable. A union that dries quickly is an early failure; a union that grows leaves and later bends, cracks, or breaks is a different diagnostic problem. For that later pattern, use a focused guide to diagnosing a graft union that dries out or breaks after bud growth.
Compatibility is another category. Incompatibility can eventually show up as swelling, cracking, or a union that never firms up, but that is a slower, later picture than an early failure caused by drying or poor contact. A graft can be technically clean and still be a poor biological pairing.
Timing changes the biology, not just the success rate
Dormant scion grafting works within a narrow relationship between the two partners. The scion is stored in a dormant state so it does not demand more water than the unfinished union can provide. The rootstock, meanwhile, should be waking and able to supply active tissues and moisture. If both pieces are deeply dormant, callus development may be slow. If the scion has already leafed out while the union is incomplete, water loss becomes harder to manage.
Collect scion wood while it is fully dormant, store it cold and slightly humid, and graft as the rootstock begins active growth. In zones 4–9, that may fall anywhere from early spring to later spring depending on species, elevation, winter length, and whether the rootstock is protected. A calendar date copied from another garden is a poor substitute for observing swelling buds and local temperatures.
Warmth supports callus formation, but warmth alone cannot rescue dried tissue or a moving joint. Protect fresh grafts from drying winds and hard freezes. If grafting indoors, avoid placing the union beside a heater or in direct hot sun.
For a seasonal comparison, read whip-and-tongue grafting versus budding: which method fits the season. Budding can make better use of limited scion material, but it belongs to a different seasonal window and requires a living bark layer that lifts cleanly.
Aftercare is a pressure-and-moisture problem
After binding, the union has two immediate enemies: drying and movement. Keep the cut surfaces enclosed, support the graft against wind, and prevent the scion from being shaded by aggressive shoots if it needs light to develop leaves. Do not assume that bud growth proves the union is strong. The scion can spend stored energy before the connection carries the full load of a leafy shoot.
Inspect without tugging. Look for swelling above or below the binding, drying buds, mould trapped under a seal, or shoots emerging from the rootstock below the union. Remove those competing shoots while they are small; otherwise they can divert water and carbohydrates into the rootstock’s own growth rather than the scion.
When to loosen or remove the tie depends on the tape, the species, and how quickly the stem expands. Check regularly once growth is obvious. A tie that has begun to bite into expanding tissue needs attention, but removing support too early can expose a weak joint to wind. The correct decision is based on visible expansion and union firmness, not a universal number of weeks. A guide to how to prune rootstock shoots below a graft union covers the follow-up cuts.
Choose your first graft by matching the problem to the method
Choose whip-and-tongue when the rootstock and scion are close in diameter and you can make controlled, flat cuts. Choose a splice graft when you want fewer cuts for practice and can bind the joint securely. Choose a cleft graft when an established branch is substantially thicker than the scion and the branch can tolerate the split.
Choose budding when the season supplies a suitable actively growing bark layer or when scion wood is limited. It is not simply a smaller version of whip grafting; the timing and handling are different.
My judgment call for a first project is unglamorous: use spare dormant shoots, not a valued tree. Make several identical practice cuts, examine the cambium edges, and bind one only after the pieces sit without rocking. The cheapest graft is the one that teaches your knife hand before a favourite branch is involved.
Three questions that settle the next grafting decision
Can I graft two different fruit tree species together?
Compatibility is usually strongest within the same species and often within the same genus, but that is a starting rule rather than permission to combine any two related-looking trees. Some distant combinations fail quickly; others form a union that grows for a time and later becomes weak. Check a recognised compatibility chart for the exact rootstock and scion pairing before cutting. “Fruit tree” is not a compatibility category.
How long does a graft take to heal?
Separate initial callus formation from a strong, weather-resistant union. Callus may appear before the connection can safely carry a vigorous shoot. Species, temperature, graft type, scion condition, and aftercare all change the timetable. Visible bud growth is encouraging, but it is not proof that the union has finished strengthening.
Should I use grafting wax or grafting tape?
The main job is to keep the cut surfaces from drying and to prevent movement. Stretchable grafting tape can bind and seal a small union. Wax or another compatible sealant may help cover exposed larger cuts, but no sealant can correct missed cambium or a joint that rocks. If your first decision is between better alignment and more wax, choose better alignment.
Save the diagram beside your knife, then practice on dormant shoots before the rootstock wakes. The next decision is not which product to buy; it is whether your available stems are the right diameter and season for the cut you can execute cleanly.
Frequently Asked Questions
Can I graft two different fruit tree species together?
Explain that compatibility is usually strongest within the same species and often within the same genus, while distant combinations may fail immediately or form a weak delayed union; recommend checking a recognized compatibility chart for the specific rootstock and scion.
How long does a graft take to heal?
Separate initial callus formation from a strong, weather-resistant union. State that timing varies with species, temperature, graft type, and aftercare, so visible bud growth is not proof that the union is fully strong.
Should I use grafting wax or grafting tape?
Explain that the main job is to keep cut surfaces from drying and prevent movement; compatible grafting tape can bind and seal small unions, while wax or sealant may be useful on exposed larger cuts but cannot correct poor cambium alignment.